MoneyWorks Manual
Importing into Other Files
The procedure for importing other files (names, transactions, products, etc.) is the same, except that the file structure and import options will differ. For QIF Bank Statement importing see Importing Bank Statements, and for importing taxes see Importing Tax Rates.
- Choose the type of information (Names, Products, etc) to import from the Import submenu in the File menu
The File Open dialog box will be displayed
- Locate the file you wish to import and click Open
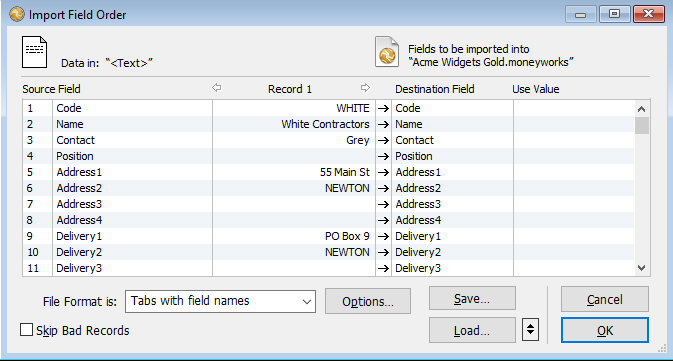
If you used the Import XML, the XML data will be imported directly — see XML Importing. Otherwise the Import Field Order window for the import file is displayed.

This shows a preview of the data in the file, allowing you to step through it, and match the data to the MoneyWorks fields.
Note that if the information is already on your clipboard (having been copied from a MoneyWorks document or another application), you can choose Edit>Paste to open the Import Field Order window.
- Choose the import file format from the File Format pop-up menu
The import file formats are described at Import.
- Match the source fields in the data file with the destination fields you want to import and set any options.
For specific information on field definitions and import options see the appropriate section (transactions, payments on invoices, names, products, or job sheet items).
MoneyWorks will not import any data that does not pass its validation checks. How it handles errors is determined by the Skip Bad Records option:
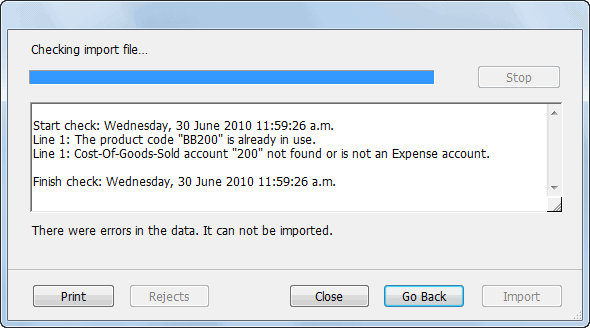
- If the option is off (the default), MoneyWorks first scans through the entire import file to check the data for validity. If there are problems with a record, an error message will appear in the scrolling list with the line number that the error occurred on. No records will be imported.
- If the option is on, MoneyWorks will check each record individually. If it is valid, it is imported. If there is a problem it is not imported but is instead written to a text file “Rejected Import Records.txt”. You can subsequently correct the rejected records and re-import them.
- Set the Skip Bad Records option if required
- Click the Options button to specify any import options
The options vary depending on the file being imported into. For example, when importing Products or Names, you might want to update existing records in MoneyWorks.
- Click OK to check and import the data
The Import Status window is displayed and the import/scan started. Any errors found are listed1.

- If you want to stop the import/scan, click the Stop button. Any records already imported will remain in MoneyWorks.
- If there were no errors, and the Skip Bad Records option was not set, you will be asked if you want to import the records. Click Import to do the actual importing of the data.
- If there are errors and the Skip Bad Records option was not set, none of the data will be imported. You must correct the errors and start again.
- If there are errors and Skip Bad Records is set, any bad records are written to the reject file. Click the Rejects button to view them in a text editor. You should correct them, save them in a file with a different name, and re-import them
- You can print the error list by clicking the Print button.
- Clicking Back will close the progress window and return you to the import map configuration window.
Tip: If you have a lot of records to import, turning off the MoneyWorks preference Enable Rollback and Crash Recovery can make importing up to ten times as fast. Remember to turn the option back on afterwards.
1 Possible errors are listed at: Transactions; Names and Products . ↩