MoneyWorks Manual
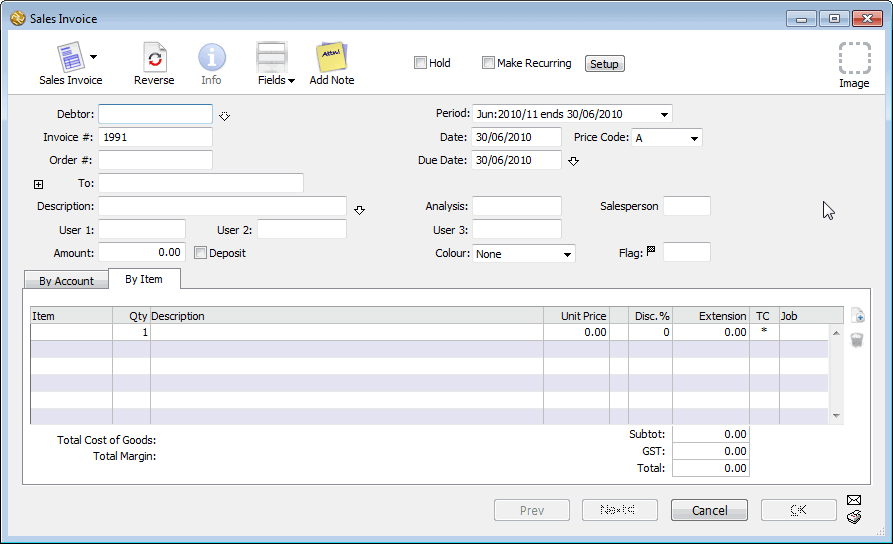
Entering Sales Invoices
Each Sales Invoice transaction credits the accounts specified in the transaction and debits the appropriate Accounts Receivable account (as specified in the debtor record)—you don’t need to worry about this, as MoneyWorks does all the accounting for you.
Note that there are several options in the Document Preferences which apply directly to Sales Invoices such as your standard payment terms, an automatic credit hold feature for overdue debtors, and the sequential invoice number — see Sequence Nos.
To create a new sales invoice:
- In the Transaction list, click the New button or press Ctrl-N/⌘-N
A new transaction window will open.
- If necessary set the transaction Type to Sales Invoice
Pressing Alt-Shift-4/Ctrl-Shift-4 is a keyboard shortcut for this.
An invoice number will be automatically assigned to the transaction in the Invoice # field. The invoice number sequence is set in the Document Preferences dialog box. When you first start using MoneyWorks, it will be 000001—you may want to reset the sequence in the Preferences — see Sequence Nos.
- Enter the code for the debtor into the Debtor field
The details of each debtor are stored as a Name record — see Names, and each is uniquely identified by the code.
If the Debtor already exists: If you have used the debtor code before, the name of the debtor will automatically appear in the To field.
If you are unsure of the code, either key in a part of the code or press the tab key. The choices list will display a complete list of debtors and customers. Double-click on the correct one.
You can "drill down" to see and change the debtor information by clicking on the down arrow next to the debtors field.
If the Debtor is a new one: If the debtor is not already in your system, you will need to create a new debtor record. To do this, enter a code for the new debtor and press tab. As the code will not be found the choices list will be displayed. Click the New button to create the new Names record — see Entering details of a Names record.
If the Customer is a branch: If the customer is a branch, use the branch code. If you have set up the corresponding head office correctly, you will be able to receipt money paid by the head office against the branch invoice.
Note: The invoice will be in the currency associated with the debtor.
- Tab across to the Date field and replace the date if necessary
By default, this will contain today’s date or the last date used.
If this customer is eligible for a prompt payment discount, details of this will be shown next to the Due Date field. The prompt payment is based on the transaction date, not the payment date.
- If you want to override the prompt payment terms, click the downarrow next to the Due Date field

The Discount Terms window will open. Change the settings and click OK to change the terms for this invoice only.
- Enter the customer order number into the Order # field
You can store up to 13 characters in this field.
- Tab through the company name which has been copied from the debtor record into the To field
Usually you will not need to alter this.
If the Address is different: If the goods are to be sent to an address that is different from the normal address of the debtor, you can enter a delivery address for this invoice — see Delivery and Mail Addresses.

- If the address is hidden, click the Address Disclosure icon
The address fields will display.
- Set the Delivery To check box and type in the new delivery address

Use the return key to split the address over more than one line.
Alternatively, you can click the Deliver to... button to show the Names choices window, and select the delivery address from an existing customer or supplier.
- Enter a description for the invoice into the Description field
This description is shown in the transaction list window and helps you identify the transaction. Depending upon how your invoice form is designed, it may also appear on the printed invoice.
- [optional] Enter the invoice total into the Amount field
This amount will be in the currency of the debtor.
If the Auto-Calculate Transaction Total option is on (which it will be by default) in the Document Preferences, you will not need to fill in the Amount field for sales invoices—it will be calculated for you based on the values in the detail lines of the invoice transaction. This means that your invoices do not have to be pre-calculated before you can enter them.
If this option is off, the OK and Next buttons dim when an amount is entered into the Amount field. The transaction is not complete until the total amount is allocated to one or more accounts.
- If the customer is making a deposit at the time of purchase, set the Deposit check box
The Make Deposit window will be displayed when you accept the transaction. Note that if the deposit box is set, the invoice will be posted when you click OK or Next.
- Check the due date for payment in the Due Date field
The due date for the invoice is automatically calculated based on the payment terms set in the debtors name record, but can be overridden.
- Press Ctrl-tab (Mac) or Ctrl-` (Win) to move to the first detail line
The gross total for the invoice needs to be allocated to one or more accounts before the transaction can be entered. Create a new detail line for each account or product to be credited with part of the total amount.
To find out how to enter detail lines by account code or by product code — see Entering Detail Lines.
Note that if the Auto-Calculate Transaction Total option is off in the Document Preferences, the OK and Next buttons remain dimmed until the transaction Amount and the total of the detail lines balance.
- When the transaction is complete click Next or press keypad-enter
The transaction is saved a new one is displayed. Click the OK button if this is the last transaction to be entered.