MoneyWorks Manual
Defining a Column
The Parts down the left side of the report specify what will be printed on each line of the report. We also need to specify what will be printed in each column.

- Double click on the Column label (the box that says COL1)
The Column Settings dialog box will open. If you get a different box, cancel it and try again.
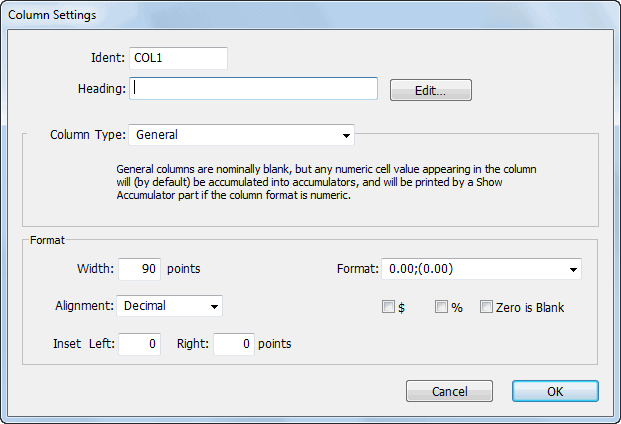
This is used to specify what is put into the columns of the report. We want the first column to be the account code.
- Type “Account” into the Heading field
- Set the Column Type pop-up menu to Account Code and click OK.
Adding a New Column

- Click the Append Column Toolbar button
Another column (COL2) will be added.
- Show the Column settings for this new column by double clicking on its label (where it say COL2)
- Set the Column Type pop-up to Description, and click OK
- Use the Append Column Toolbar button to add another column, and double click its header to show the Column Settings box
- Set the Column Type pop-up menu to Actual
This will print actual ledger values in the column.
Note that two other pop-up menus are enabled. The first one indicates what sort of ledger information we want to show (in this case Movement This Period), whilst the second shows the financial year (as This Year).
- Set the Signs pop-up menu to Adjusted
MoneyWorks stores debit balances as positive numbers, and credits as negative. If we were to just print out the balances as they are stored, the sales/income accounts (which generally have credit balances) would all be printed as negative numbers. Selecting the Adjusted option tells MoneyWorks to print income balances with reversed signs, but leave expenses balances untouched.
- Type “Actual” into the Heading field, then click OK
The column just created will contain the actual account balances for the report period.
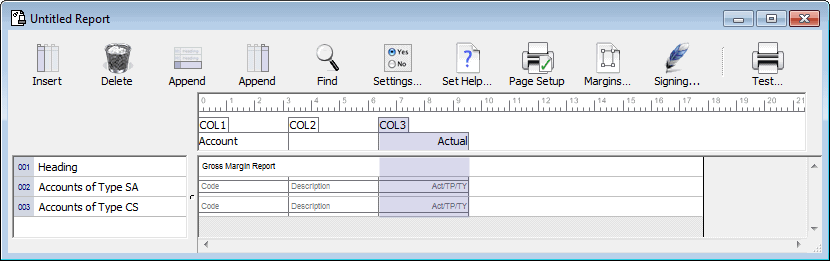
Congratulations! You have just created a report. It should look like this.