MoneyWorks Manual
Invoice Receipts as Receipt Transactions
If you have just a few invoice receipts to process, use the following method:
- Create a new receipt transaction
To do this you should have the transactions window topmost and press Ctrl-N/⌘-N., and if necessary set the type of the new transaction.
Tip: To receive payment against a particular invoice, right-click on the invoice in the Receivables list and choose Receipt this Invoice.
- Click the Customer check box and type in the debtor code
This is essential so that MoneyWorks can check for outstanding invoices for the debtor. The From field will be automatically filled in with the customer name, and a list of outstanding invoices will be shown under the Payment on Invoice tab.
If the payment is from a head office, enter the head office code—any invoices made out to it or to any of its branches will be made available for paying — see Head Office Billing.

- Check that the bank account and date are set correctly
If you are not going to bank the money immediately, you should receipt the money into a banking holding account and use the Banking command when you actually bank the money.
If you leave the Description field blank, MoneyWorks will put in a list of the invoices you are paying when the transaction is saved.
- Type the amount of the receipt in the Amount field
- Set the payment method in the Paid By pop-up menu
If you don’t care about the payment method you can leave this set to None. However if you are using the Banking command to print a deposit slip, you will want to differentiate cash from cheques.
To record the cheque/credit card details:
- Click the down arrow next to the Paid By pop-up menu
If the Paid By pop-up menu is itself highlighted, you can press Ctrl-downarrow/⌘-downarrow.
The Receipt details screen will be displayed—the details of this depend on whether you are processing a credit card or another form of payment.
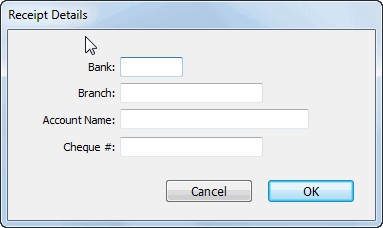
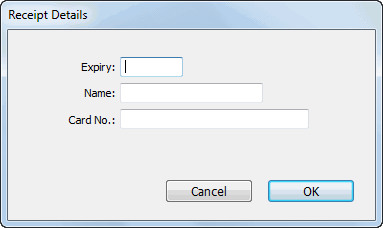
Enter the details of the receipt. Note that you only need to enter the cheque/card details if they differ from those stored on the customer record (as displayed next to the customer code).
- Press Ctrl-tab (Mac) or Ctrl-` (Win) to move to the Pay column of the first invoice
- Allocate the Amount to the outstanding invoices
See Allocating Receipts to Invoices for details.
- When all the money has been allocated, click the OK or Next buttons to accept the transaction
Clicking Cancel will discard the transaction.
Note: The receipt transaction will be automatically posted. You will not be able to change it once it is accepted, although if it is incorrect you will be able to cancel it and reprocess the receipt.
If some of the invoices are marked to be written-off or you have allowed prompt payment discounts, the following dialog box will be displayed when you click the OK or the Next button:
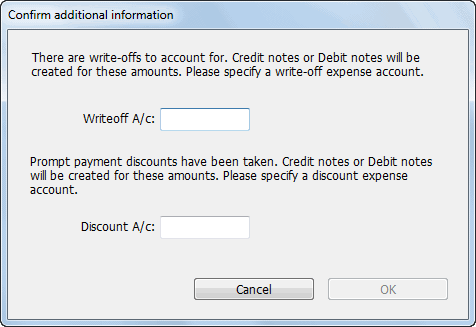
You need to nominate the writeoff and/or the prompt payment discount account (if you cannot remember the code, press tab to display the account choices). Click Accept & Post to process the receipt, or Cancel to take you back to the receipt window.