MoneyWorks Manual
 The List Box Tool
Use a List Box when you want to include:
- The detail lines of an invoice, payment or receipt.
- The individual transactions of a statement
- The invoices paid with a cheque (or remittance advice)
First, here are some important points to remember about list boxes:
- The type of form determines what information will be displayed in list boxes on the form. MoneyWorks will automatically select the correct records for you.
- You can specify a subset of the records that MoneyWorks finds to be displayed in a list.
- A single list box can show multiple columns of information.
- You can have more than one list box on a form.
- If there is more information to be displayed in a list than will fit, MoneyWorks can automatically print another page of the form to accommodate the information (this is optional).
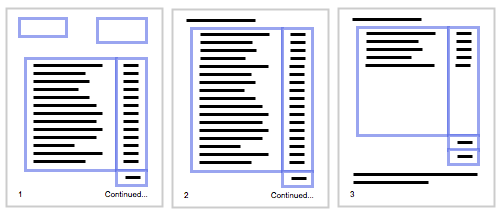
- Where a list extends over more than one page, the list can start higher up the page on the first page than subsequent pages, and end higher on the last page than previous pages, as shown below.
To create a new list:
- Select the List tool
- Click and drag a rectangle that will be the bounds of the list
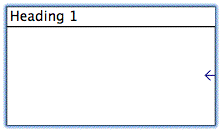
A new list box will be created with a single column. The list box will be active. This means that you can modify the content of the list. When a list is active, its border is outlined.
If you click outside the list rectangle, the list will be deactivated, and will behave like any other object (so it can be moved, resized etc).
To activate an inactive list box so that you can edit it:
- With the list tool, click once on the list or with the arrow tool, double-click on the list
The list will activate (indicated by its border being outlined)—it must be active to manipulate its columns.
To add a column to the currently active list box:
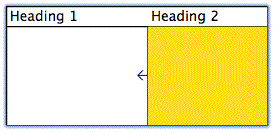
- Choose Edit>New Column or press Ctrl-N/⌘-N
The new column will be added on the right hand side of the list. It will be selected (black).

The Dynamic Column: Notice that the first column has been shrunk to make room for the new column. In fact, when adding or duplicating a column, it is the dynamic column that is resized to make room for the new column. This column is indicated by a small left-pointing arrow on its right hand edge.
You can select which column is the dynamic one by holding down the option key (Mac) or the Ctrl key (Windows) and clicking on the column.
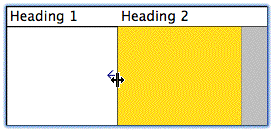
To resize a column:

- Move the mouse over the right hand edge of the column
The mouse pointer will change shape.
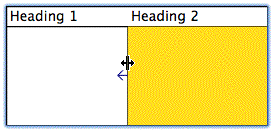
- Click and drag the column edge until the column is the desired width, then release the mouse button
Notice that the column adjacent to the one being resized also resizes. When you shrink one column, its neighbour grows to fill up the space.
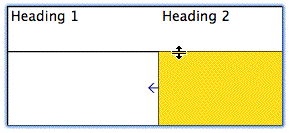
Ctrl/Option-Resizing:
If you don’t want the neighbouring column to grow or shrink when you resize a column, hold down the ctrl key (Windows) or the option key (Mac) as you do so. The columns to the right of the one being resized will move as you drag the mouse.
A shaded area will appear at the right-hand side of the list box. This free area will be used up if you add more columns. If you deactivate the list while there is free space in the list, the list box will shrink.
Note: If you resize an inactive list so that the width of the list box changes, the dynamic column changes in width by the same amount that the list’s width changed. No other columns will be affected. You cannot make a list box any smaller than reduction of the dynamic column will allow.
To move a column:
- Move the cursor over the column until it changes into a hand
- Drag the column to its new location
The column will move as the hand crosses column boundaries.
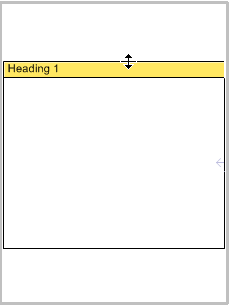
To resize the List Header:
- Move the mouse over the bottom of the list header until it changes shape
- Click and drag to resize the header
To remove the heading, drag the bottom of the header right to the top of the list.
To reduce the list size on the first and last pages
Lists have First Page Starts and Last Page Ends markers, allowing your lists to start and end at different locations on different pages. You cannot see these markers when you create a list as they are, respectively, at the very top and bottom of the list box. You need to option/ctrl drag the top or bottom of the list towards the list centre to expose them.
Caution: In attempting to move the markers, it is relatively easy to inadvertently resize or move the entire list. If this happens just release the mouse and press Ctrl-Z/⌘-Z to undo the change.
To reduce the list size on the first page:
- Position the cursor at the top of the list
This is the line that marks the top of the list, and is above the list header.
- Hold down the option key (Mac) or the ctrl key (Windows)
- Click and drag the top of the list down
The First Page Starts marker should move down, pushing the body of the list (and list header) down and leaving a blank space at the top of the list box. List items will not be printed in this blank area on the first page of the form, but will on every subsequent page.
- To move the First Page Starts marker again, hold down the option/ctrl key and drag the marker up or down.
To reduce the list size on the last page:
- Position the cursor at the bottom of the list
- Hold down the option key (Mac) or the ctrl key (Windows)
- Click and drag the bottom of the list up
The Last Page Ends marker should move up, pushing the body of the list upward and leaving a blank space at the bottom of the list box. List items will not be printed in this blank area on on the last page, but will on every other page.
Note: The start and finish offsets will only be used if the Allow Multiple Pages option is turned on AND the form includes objects with visibility attributes First Page Only, Last Page Only, etc. It is expected that these objects will show in the blank space thus created by the offsets.
To Change Column Calculations, Formats and Headings
- Double-click the column
The Calculation dialog box for the column will open. This is slightly different from the dialog box for an ordinary calculation—it has an extra field for specifying the column heading.
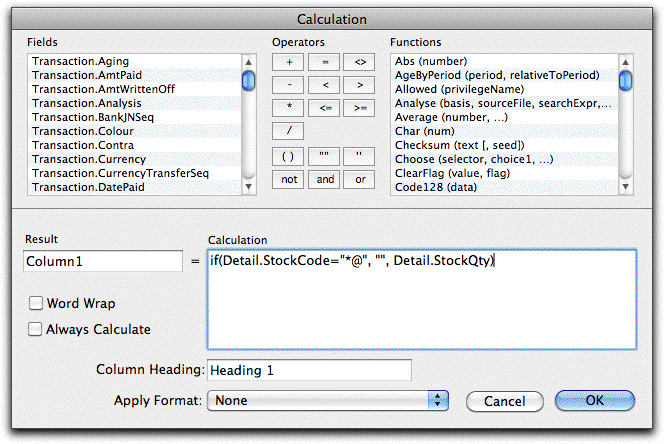
- Enter the formula for the data to be displayed in the column as you would for a calculation box
For an invoice/receipt form, the information will usually come from the Detail fields. For a statement or remittance advice, it will usually come from the Transaction fields. These are the records that repeat in the list.
If you want to refer to the calculation result from another column or from a calculation box elsewhere on the form, you may want to give the column a meaningful name in the Result field
If you want to refer to the column from outside the list, you will need to name the list using the List Options button.
- Enter a column heading if required
The column heading is only displayed if the List Heading is exposed.
The column heading can be include text expressions within << and >> that will be calculated at runtime.
- Set the formatting options as you would for a calculation box
Remember than columns showing figures should have the Word Wrap option off for correct decimal alignment. Turn the Word wrap option on if you want the text in the column to be wrapped over multiple lines. The data in any non-word-wrapped columns to the right of a word-wrapped column will align with the last line of text in the word-wrapped column.

To change the text alignment of a column:
- Highlight the column by clicking on it
- Choose the desired text alignment from the Edit>Form>Alignment sub-menu, or click the appropriate alignment button in the Tools Palette