MoneyWorks Manual
Setting the Form Size
The default form size will depend upon your printer, but in general is A4 with 1.5cm margins. Both the size of the form and the margins can be changed. You can lay out the page so that more than one form will be printed per page. This is especially useful for making labels.

- Click the Layout toolbar button
The Layout dialog box will open.
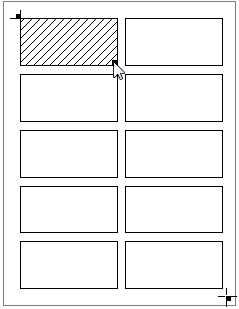
The Layout dialog box contains a representation of the current page size for your printer. If you want to set up the form to be printed on a different size of paper, you need to click the Page Setup button in order to select the desired paper size.

The printable area of the page is represented by a dotted or grey rectangle. You cannot use any of the page outside of the printable area.
- Make the changes to the form layout (see below)
- Click OK to save the new form layout settings, or Cancel to discard them
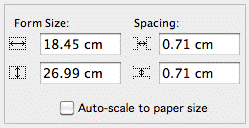
Auto-scale to paper size: Set this option on if you want your form to automatically scale depending on the size of paper that is being printed. This allows you for example to print forms designed on A4 onto US Letter. Some distortion may result,
The Form Rectangle

The form itself is represented by the patterned rectangle.
To change the size of the form, either key the measurements into the Form Size fields or:
- Click and hold the mouse button inside the form resize handle
This is the black square in the bottom right of the form rectangle
- Drag the mouse until the form is the desired size, then release the mouse button
The form rectangle will change size as you drag, with the current size being displayed continuously on the right of the window.
If you make the form smaller so that more than one form could fit inside the area bounded by the margins, multiple form rectangles will be displayed. This is how you create mailing labels or any other type of form that is to be printed more than one to the page.
Form Spacing
When there are multiple form rectangles on the page, you can change the spacing between the form rectangles.
To change the spacing either key the values into the Spacing fields or:
- Click and hold the mouse button on one of the extra form rectangles (any except the patterned form rectangle)
- Drag the mouse and release the mouse button when the desired spacing is achieved
The current form size and spacing is displayed in centimetres at the right of the dialog box.
Auto-scale to paper size: Set this to have the form automatically scale to fit whatever size stationery is actually used. For example, a form designed for A4 will be truncated if printed on US Letter. If the Auto-scale option is set however, it will be proportionately scaled down to fit.
The Top-Left Margin
The top and left margins are controlled by the location of the form rectangle itself, and can be changed by either keying the value into the appropriate margin field or:
- Drag the form rectangle to the desired location
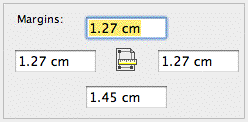
Note that the top-left margin cannot go outside the printable area of the page and you cannot make the top-left margins so big that the form will extend beyond the bottom-right margin.
The margin settings are displayed on the right hand side of the window. The measuring units (cms, inches or points) are chosen from the Units pop-up menu at the bottom left of the window.
The Bottom-right Margin
The bottom and right margins are controlled by a cross-hair which appears towards the lower-right of the page.

To change the bottom and right margins, either key the values into the appropriate margin fields or:
- Click on the small black box of the cross hair (or just below and to the right of it)
- Drag the cross hair and release the mouse button at the desired point
Just as for the top-left margin, you cannot drag the margin marker outside of the printable area of the page. Nor can you move the margin inside the form area.
The Print Order controls
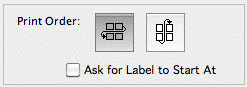
When the form is set up to print more than one per page (such as labels), you can control the sequence in which the forms will print—either in horizontal or vertical bands.
To change the printing order for multiple-forms-per-page:
- Click on the Print Order icon representing the order you want
MoneyWorks has the facility whereby it can prompt you to start at a certain label. This is useful if you have partly used label sheets.
- Set the Ask for Label to Start At option if you want to be prompted for the first label to use when the form is printed
When set, a prompt is given when the first page of the form is printed — see Choosing the start label.