MoneyWorks Manual
Creating a new Account
- Click the New toolbar icon in the Accounts list or press Ctrl-N/⌘-N
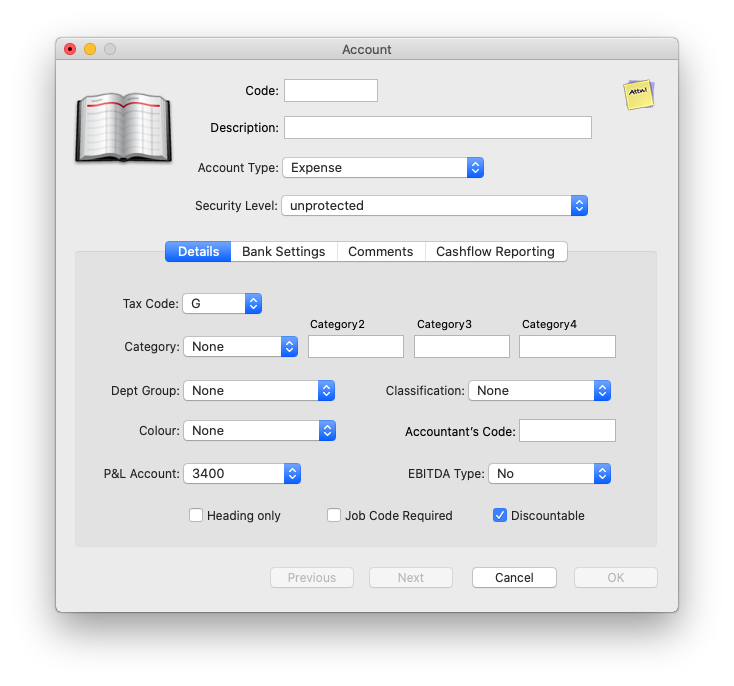
The Account entry window will be displayed.

- Enter the account code into the Code field
This code is used to identify the account when transactions are entered.
It may be a maximum of 7 characters in length — characters can be either alphabetic or numbers — letters are automatically capitalised — the characters “@”, “?”, “-” and space are not permitted.
- Enter the text description for the account into the Description field
- Choose the appropriate type of account from the choices in the Account Type pop-up menu
The pop-up menu contains the 10 general and 6 system account types.
If you are making a bank account... Set the account type to Bank Account if you are creating a bank account or similar (such as a credit card account). Bank accounts have further options under the Bank Settings tab.
Note: Once you have made an account a system account, the account type cannot be changed. Non-system account types can be changed under certain conditions —see Changing the Account Type.
- Assign the appropriate GST tax code to the account by choosing the code from the Tax Code pop-up menu
The taxcode that you specify here will determine the default GST that is applied whenever you use the account in a (non-journal) transaction.
Account Categories: Account categories are used to group accounts together for reporting and enquiry purposes. They can be altered at any time without affecting the structure of your chart of accounts.
Each account can have up to four categories associated with it. The first category is special, and the values are determined by predefined values from the Categories list —see Account Categories — there are special report breakdowns that can be associated with this category —see Breakdowns). The other categories are free form for your own use, and can contain up to fifteen characters.
- If you have previously defined account categories, assign the category to this account using the Category pop-up menu
A category is an optional way of grouping accounts together for reporting purposes. You can add or change categories at any time.
Department Group: In Gold only, if you want to associate an account with one or more departments in order to allocate and track income or expenses in more detail, you do so by setting the Dept Group pop-up menu to the group which has previously been set up to contain these departments. If you do not wish to departmentalise this account, leave the Dept Group pop-up menu set to None.
If you have not already created departmental groups there will be no options in the pop-up menu other than None. You will need to create the group —see Creating a Departmental Group and then modify the account. Groups cannot be assigned to system accounts.
Colour: Use the colour to set the colour of an accounts record. The colour is like a label for your own use.
Accountant’s Code: If your account code differs from that of your accountant, and if you want to sent your accounts in electronic format for importing into the accountant’s practice management system, you should enter the accountant’s code for this account into this field. It can be up to nine alpha-numeric characters long.
P&L Account: In Gold only, for non-balance sheet accounts, the P&L (Profit and Loss) Account pop-up menu is enabled, listing all the accounts of type PL. The one specified in this pop-up menu is the one into which the balance for the account will be automatically transferred at the end of the financial year —see Opening a New Financial Year.
EBITDA Type: Used to show earnings before interest, tax, depreciation and amortisation. If an expense account is one of these, set this pop-up menu to the appropriate value. A number of reports (such as the Profit and Loss Comparison) have an EBITDA setting which will separate out the EBITDA values. Note that depreciation and amortisation are treated together.
Heading Only: If you want the account to be primarily used as a heading in summary reports, set this option. You will not be able to directly code to these accounts, and they will be greyed out in the choices window.
Job Code Required: In Gold only, if you are using job costing, and want to enforce the entry of a job code whenever this account is used in a transaction, turn this option on (but note that it does not apply to journals, where you cannot specify a job).
Discountable: In Gold and Express, turn this option off (it is on by default) if you do not want invoice lines (such as freight) coded to the account to be eligible for prompt payment discounts.

Security Level: In Gold/Datacentre, for sensitive accounts, set the security level popup from unprotected to a higher protection level (more stars indicates greater protection). Only users with an equivalent or greater star Acct Security Level will be able to view the account, or any transactions that use it. For example, payroll accounts might have higher security than general expense accounts to prevent your normal payables people accessing the payroll data.