MoneyWorks Manual
Details
The Details tab (shown previously) allows you to specify information about how you use the item (e.g. you only buy it, you sell it or whatever). In addition you can provide general comments (up to 1020 characters) about the item, and there are eight custom fields available for your own use (the first two can contain up to 255 characters, the others up to 15).
- Enter any comments or custom information about the item
Tip: If you are using forms designed with the Forms Designer, you can store long descriptions of each item in the comments field and use the “Lookup” function to insert it into your invoice when it is printed. In this way your MoneyWorks file will not be made large by storing redundant item descriptions.
If you buy this item
If you purchase an item, the We Buy This check box must be checked and a general ledger code provided against which the purchases can be charged (it should be an expense account). You must do this if you want to use the item in a purchase order, cash payment or creditor transaction. In addition, you can enter optional information about the supplier and pricing of the item.
- Click the We Buy This check box if you purchase this item
The Expense Account when Buying field will be activated.
- Enter the general ledger expense account code for recording purchases of this item
This control account is automatically used when you generate a purchase (a cash payment or a creditor invoice) for the item. It can be departmentalised. If the “Append Salesperson” option is set, the information in the salesperson field of the transaction is automatically appended (as a department) to the account code1. This is useful if you want to monitor transactions by salesperson —see Using Products with Departments. You should have a complete understanding of how this option operates before using it.
You can also set the expected purchase price and the usual supplier for items that are purchased. The purchase price will be automatically updated any time you buy the item.
If you sell the item: If you sell the item, the We Sell It check box must be set—you must do this if you are going to use the item in a cash receipt, debtor invoice or sales order. Whenever you sell an item, you generate income. Thus if you are going to sell the item you need to specify the selling price and the sales (income) general ledger code.
- If you are going to sell the item, set the We Sell It check box
The Income Account When Selling (the Sales control account) is enabled.
- Enter the general ledger code for the sales control account
This must be an existing account, and should be of type Income. It can be departmentalised. If you use the Append Salesperson option, the information in the Salesperson field of the transaction will be automatically appended (as a department) to the account code when the item is sold.
You can also set the selling price(s) for items that are sold.
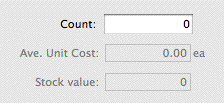
If you count the item: If you want to count the item, you need to set the We Count It check box. If this option is on, MoneyWorks will maintain a simple count of the item.
- If you count the item, set the We Count it option
MoneyWorks will maintain a running total (visible and alterable in the item’s Inventory tab) of the quantity that you have. When you purchase an item the total will increase (normally by one, but possibly by a different quantity if the item has a Unit Conversion), and when you sell an item, the total will decrease by one.
This form of item counting is fairly “loose”. You can turn it on or off at any time, and alter the counted balance (in the Inventory tab). Unlike full inventory, counted items will be expensed on purchase and not appear on the balance sheet (unless an asset/liability account is used as the buying/selling account). No audit trails of counted items is maintained.
Note: the two options We Count It and We Stock it and treat inventory as an asset are mutually exclusive: only one can be set for an item. If you want to change from counting to full inventory, you will need to turn off the We Count it, and then turn on the We Stock it.
If you stock the item: If you stock (i.e. maintain full inventory accounting) the item, you need to set the We Stock It check box. If this option is on, MoneyWorks will maintain an inventory level and average costing for the item—you can only turn this option on if the class of the item is set to Product.
- If you stock the item, set the We Stock It option
If you buy this item as well as stock it, you will purchase it into a current asset account (as opposed to an expense account).
If you sell this item as well as stock it, you will need to specify a cost of goods account. When you generate a sales transaction, MoneyWorks will automatically transfer the item from the stock account (which is an asset) into the cost of goods account (which is an expense account),
If you turn on this option after turning off the We Count it option, MoneyWorks will offer to do a stock creation journal to bring the counted total into stock when you click OK on the item record.
- Enter the appropriate general ledger code into the Asset Account for Stock field
This must be a current asset account. The account can be departmentalised, but you need to specify the account-department code here as there is no option to append the department code at transaction entry time.
Note: If you turn on the We Stock it ... option after turning off the We Count it option when the count was non-zero, MoneyWorks will offer to do a stock journal to bring the counted total into stock when you click OK on the item record.
Similarly if you turn off the We Stock it... option when the stock on hand is non-zero, MoneyWorks will need to do a stock journal to bring the stock on hand value to zero.
In both cases you will be presented with the following dialog:
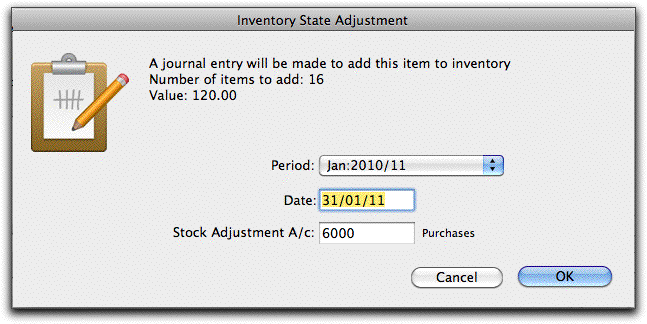
This indicates the quantity of the item and the value that will be created or written off. The Stock Adjustment account is normally the cost of goods sold account for the item. You must accept this journal to be able to turn inventory on or off.
Item’s Barcode: You can store the barcode (or alternate product code) for the item in the Barcode field—this can be up to 19 characters long. Barcodes can be printed on forms and reports in either EAN13 (UPC) or Code128.
The barcode can be used as an alternate product code when you are entering transactions, provided it does not conflict with an existing item code. When an entry is made into the code field of a transaction, the item codes are checked to see if the entry matches; if no match is found the barcodes are checked. If a match is found, the entered barcode is replaced by the item code. If more than one match is found, the item choices window is displayed with just the items that have the same barcode.
Item Pictures
You can add an image of an item if you wish. These can be displayed on invoices and reports, such as the item Catalogue report. To add a picture:
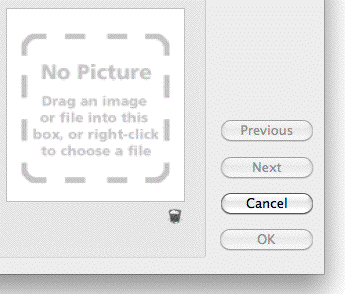
- Right-click on the empty picture field and select Import Image
The File Open dialog will be displayed
- Locate the picture file and click Open
MoneyWorks will create an image based on that in the file you selected. The image will be resampled and recompressed to an optimal size2, and saved into your custom plug-ins folder (and for networked versions, uploaded to the MoneyWorks server)3. The image will be displayed in the product window.
You can also just drag the image file and drop it into the picture box area
To delete the image:
- Click the small Waste Paper icon under the image
The previously copied image file will be permanently deleted if you click the OK or Next button.
Note: Dragging the picture out of the item window will drag a copy of the picture only (and not delete it).
1 If the Append Salesperson option is set, and the item is used in the job sheet file with the Enable Job Costing and Time Billing option set, the department is taken from the Cost Centre field of the job sheet entry. ↩
2 The pictures go into the Pictures folder—see Managing Your Plug-ins for details ↩
3 The pictures go into the Pictures folder—see Managing Your Plug-ins for details ↩