MoneyWorks Manual
Working with the Report Editor
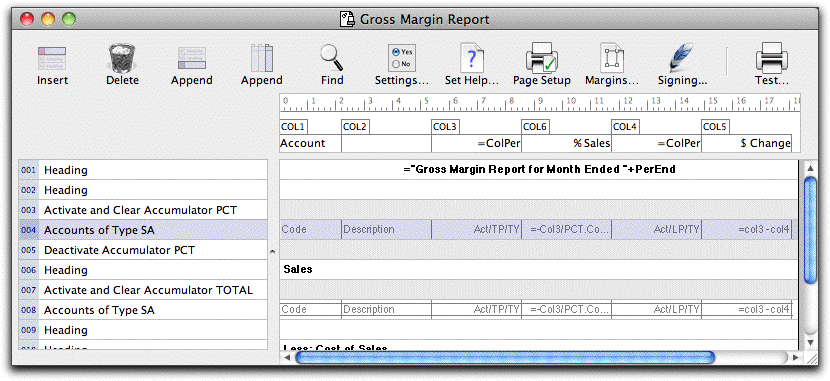
The report editor gives you access to the tools you need to change a report. Whenever you open a report for modification, the report editor window will open displaying the report Parts and Columns (for new reports, there will be only one Part and one Column).
A report is composed of Parts (going down the page) and Columns—these determine the contents of the report. A part may generate more than one line of the report, or not be printed at all. Non-printing parts are shown in grey.

Appending a New Part
Parts can be appended at the end of the report.
- Click the Append Part Toolbar button
A new part will appear at the bottom of the report.
The content and format of this part can be modified by double-clicking on the Part label, or by clicking on the Part label once and pressing the keypad-enter key. If a part is in the wrong place it can be deleted or cut and pasted to the correct place.

Inserting a New Part
Parts can be inserted above existing parts in the report.
- Highlight the part above which you would like to insert the new part by clicking on the part label
- Click the Insert Part toolbar button, or press Ctrl-N/⌘-N
A new part is inserted above the highlighted part.
If the part is in the wrong place it can be deleted or cut and pasted into the correct place.
Changing a Part
- Double click the part label or highlight the part and Choose Edit>Modify Part
The Part Settings dialog box is displayed—for information on the options in this see Report Parts.
- Make whatever changes are required and click OK
If Cancel is clicked, the part will remain unchanged.
Copying and Pasting Parts
Parts can be copied and pasted from one area of a report to another—or from one report to another report entirely. When a part is copied, any Cells on the part come too.
- Highlight the part(s) to copy by clicking on their label(s)
Hold down the Shift key and drag to select consecutive parts.
- Choose Edit>Copy
If you wish to insert the copied part(s) above an existing part in the report, click on the part label to highlight the part
If you want the copied part(s) to be added to the bottom of the report, ensure that no parts are highlighted (by clicking on the white space at the bottom of the report or clicking once on a cell).
- Choose Edit>Paste
The copied part(s) will be pasted into position in the report.
Columns can be cut and pasted as well, but (unlike parts) any Cells in the column will not be pasted.

Deleting Parts
To remove a part from the report:
- Highlight the part to be deleted by clicking on the part label
If you want to delete several consecutive parts, hold down the Shift key and drag from the first to the last part.
- Click the Delete Toolbar button
The parts will be removed.

Appending a New Column
To append a column to the right hand side of the report:
- Click the Append Column Toolbar button
A new column will appear on the right of the report.
The content and format of this column can be modified by double clicking on the Column Label—see Report Columns.
If the column is in the wrong place it can be deleted or cut and pasted into the correct place.

Inserting a New Column
Columns can be inserted between existing columns in the report.
- Highlight the column to the left of where you would like to insert a new column by clicking on the Column Label
- Click the Insert Column Toolbar button or press Ctrl-N/⌘-N
A new column is inserted to the left of the highlighted column.
The new column is set to Account Code by default. You can change this default column option by clicking the Make default check box in the Column Settings dialog box as you create a column of a new type.
The column settings can be changed at any time. If the column is in the wrong place it can be deleted or cut and pasted into the correct place.
Modifying a Column
- Double click the column label or highlight the label and Choose Edit>Modify Column
The Column Settings dialog box is displayed.
- Make whatever changes are required
- Click OK to save the changes
If you click Cancel, the changes are discarded.

Resizing a Column
Any of the columns in the report can be resized to accommodate the information being printed in that column.
- Move the mouse pointer up to the right hand edge of the Column Label at the top of the report.
The cursor will change into a resize pointer when it is positioned over the right hand edge of the column label.
- Hold down the mouse button and drag the right hand edge of the column to its new position
The column is resized on the report.
You can make a column invisible by resizing it so that it has no width.
Setting Columns to the same width
Often you want to ensure that several columns are exactly the same width. You can do this by:
- Highlighting the columns by holding down the Shift key and clicking on the Column headings
The columns will be highlighted. Note that the columns must be adjacent.
- Either: hold down the Option key (Mac) or Ctrl key (Windows) and resize any of the highlighted columns
All the highlighted columns will be set to the same width as the resized column.
- Or: hold down the Option key (Mac) or Ctrl key (Windows), and click on the right hand edge of the correctly-sized column after the cursor has changed to the column resize pointer
All the highlighted columns will be set to the same width as the column that was clicked. Continue to adjust the widths by dragging right or left.
Modifying Multiple Parts
You can highlight multiple parts in the report and modify the font and style attributes of all the selected parts. However note that in general it is better to use the standard report font. This will avoid potential font conflicts across different machines that may want to use the report.
- Hold down the Shift key and click on the parts that you wish to modify
The selected parts will be highlighted (they must be contiguous).
- Choose Edit>Modify Parts
The Part Settings window will be displayed. The Part Type will display “Mixed”.
- Click the Font button to display the Font Style window
- Choose the required Font and Style options, and click OK
- Click OK to close the Part Settings window
The highlighted parts will now have the font and style attributes selected.

Finding Text
To find the location of some text in the report
- Click the Find Toolbar icon or press Ctrl-F/⌘-F
The Find dialog will open. Enter the text to search for and click Find. The next report element (from that which is currently selected) that contains the text will be highlighted. Press Ctrl-G/⌘-G to find the next occurrence. Note that the searching will recommence at the top of the report once the end is reached.