MoneyWorks Manual
To Manually Enter a Job Entry
- Choose Show>Job Sheet Items or press Ctrl-5/⌘-5
The Job Sheet Items file will be displayed.
- Make sure the sidebar tab is not set to Budget
- Choose Edit>New Job Sheet Item or press Ctrl-N/⌘-N
The Job Sheet entry window will be displayed.
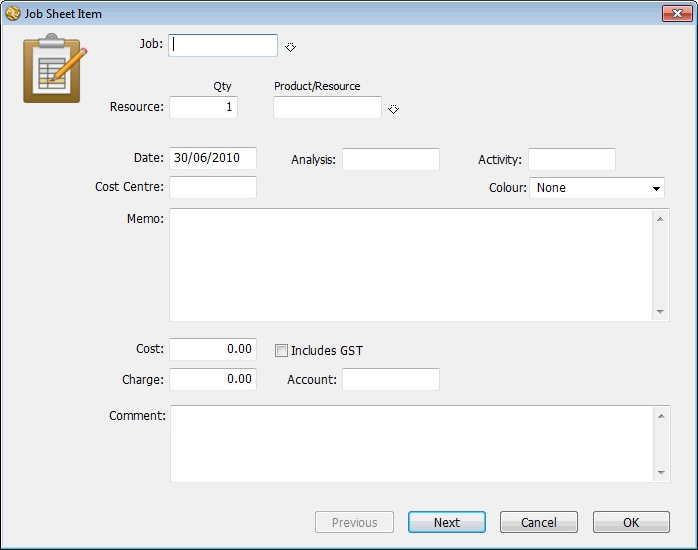
- Type in the Job Code for the entry and press tab
The job description will be displayed, and any selling Sticky Notes associated with job will appear.
If you enter an invalid code the choices window will be displayed, allowing you to select the correct code or create a new job by clicking New.
- In the Qty field, type in the quantity of the item used
This can be any class of product that you sell.
- In the Product/Resource field, enter the code for the item used
The item description, sell unit, memo and the pricing details will be displayed. This field must be filled in for every job sheet entry.
If you enter an incorrect code, the choices window will be displayed. Select the correct item by double clicking, or click New to create a new product. Note that the item’s barcode can be used instead of its code.
If the product is a stock item, a message is displayed in the window and special action is taken by MoneyWorks — see Stock requisitions.
Note: If you have Location Tracking turned on, a Location field will be available to enter the location from which the stocked item was taken (leave empty for the default location.
Similarly if you have Serial/Batch tracking enabled a Serial/Batch field will be available for the serial/batch number of the serialised inventoried items.

- Change the Date field if necessary
This is the date that the resource was used on the job.
- Enter whatever you wish is the Analysis field
The analysis field can be used for whatever you require—e.g. the initials of the person whose job sheet is being entered. Note that this and the Activity Code field can be controlled by Custom Validations.
- Enter an Activity Code, if any
Unless associated with a custom validation, this is a free form code.
- Enter the Cost Centre for the product if desired
The cost centre must be a valid department code. If the Income Account when Selling field of the item is set to a departmentalised account, this department will be automatically entered into the Cost Centre field.
- Change the Memo field if required
This defaults to the description of the resource entered. It can be up to 255 characters long, and is a description of what the entry is for. It will appear on the invoice if the Itemise in Description option is set in the Bill Job window.
The Cost, Charge and Account fields will be filled out automatically for you based on the resource used, and can be altered if required. Costs and charges are always assumed to be in the local currency.
- Enter any additional comments into the Comment field
This is for internal use only, and will not appear on any invoice.
- Click the Next button or press keypad-enter to save the entry and display a new entry screen, or OK to save and close the window
If Cancel is clicked, the entry is not saved.
Configuring the Job Sheet Entry Window: You may not wish to use all the fields in the Job Sheet entry window, or, if you are entering batched information, a given field might always contain the same information. You can configure the Job, Product/Resource, Analysis and Cost Centre fields to retain their value and/or to be omitted when you tab through the fields. To configure a field. You can also configure the Analysis and Activity Codes to require custom validations:
- Right click in the field, or if you are persevering with a single button Mac mouse, hold down the control key and click in the field
A pop-up menu with configuration options will be displayed.
- Select the option you require and release the mouse
The available options are:
Tab Into: Pressing tab while in the previous field will move you into this field;
Don’t Tab into: The field will be bypassed when you press tab;
Remember Value: The previous value that you typed into this field will automatically appear in a new job sheet entry;
Clear Each Time
The field will be blanked between each new entry.