MoneyWorks Manual
Adding a new Department
- Choose Show>Departments
The list of departments in your system will be displayed.
- Choose Edit>New Department or press Ctrl-N/⌘-N
The Department entry window will be displayed.
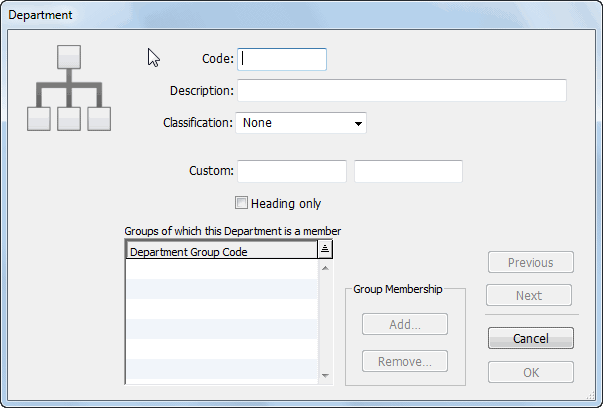
- Enter the department code into the Code field
This code is used to identify the department, and is appended to the account code when transactions are entered.
It may be up to 5 characters in length. Characters can be either alphanumeric, and letters are automatically capitalised and spaces converted to underscores. The characters “@”, “?” and “-” are not permitted.
- Enter a description for the department into the Description field
- If you have previously defined departmental classifications, assign the classification to this department using the pop-up menu
A classification is an optional way of grouping departments together for reporting purposes. You can add or change classifications at any time.
- Enter any details in the custom fields.
These are for your own use.
- If you want the department to be used as a heading in a subsummary report, set the Heading Only checkbox.
You will not be able to use the department in transactions.
Assigning to a Group
If you have already created Departmental Groups, you can add the department to the appropriate group at this point.
To add the department to a group:
- Click the Add... button
The Add to Groups window will be displayed.
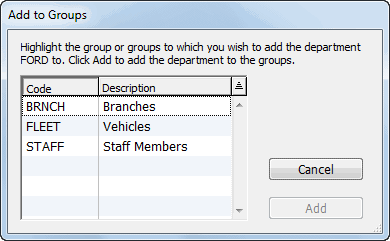
- Highlight the group(s) to which you want the department to belong
- Click the Add button
The department will be added to the nominated groups.
If you have not already created Departmental Groups, departments can be added to Groups when the groups are created or they can be assigned later.
- Click OK or Next to save the information
Modifying a Department
Any of the department information can be altered at any time—including the code. If you do alter a departmental code, any transactions that use that department will be updated (this may take some time).
To modify a department, double click it in the Department list.
Removing a department from a group
To remove a department from a group:
- Double-click the department in the Department list
The department entry window will open.
- Highlight the group(s) in the department entry window and click Remove
A dialog box asks you to choose which of the other departments in the group will receive the historic balances and any transactions for the department being removed.
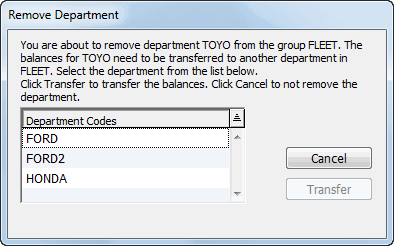
- Click on the departmental code and click Transfer to continue
All accounts associated with the group from which the department has been removed will have that subledger deleted, and any balances for the removed subledger will be transferred to the subledger of the nominated department.
All transactions, including posted transactions, that use the account-department are changed to have the nominated department instead of the removed one.
- Click OK to accept these changes
Clicking Cancel will close the window without saving the changes.