MoneyWorks Manual
Enabling TLS encrypted connections
To enable TLS encrypted connections, you will need to install an SSL certificate on the server.
An SSL/TLS certificate is used to enable encryption and hostname verification when connecting to your server. You should use encryption if you will be accessing your server over the Internet. The hostname will be verified if you connect to the server using the fully qualified domain name (e.g. myserver.mycompany.com). If you connect using the IP address, the connection can still be encrypted, but there isn’t a guarantee that you are connecting to the right server. MoneyWorks will not complain if you do this, since connecting to a server from both your LAN and the internet using its fully qualified domain name may require additional setup (e.g. hairpin routing on your network gateway — not all routers do this).
Installing a certificate manually
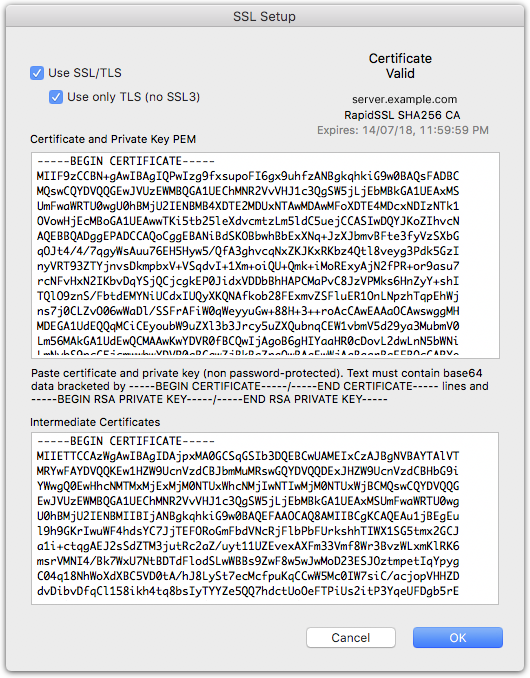
You can install a certificate manually by clicking the Edit Certificate PEM Data button in the TLS tab. The certificate data must be in PEM format, which is a standard textual base64 encoded format. If you have a certificate in a different format, you would need to convert it first. The private key must not be password-protected.
In the Certificate window you can paste the certificate, the private key, and the certificate authority’s intermediate certificate bundle. Prior to v9.2.3, the private key was included in the certificate field. That will still work. You can leave it there.
Can I use a self-signed certificate?
Yes, you can use a self-signed certificate, but you will need to install that certificate as trusted on all computers you will access the server from. This can have the advantage that you can choose a longer certificate lifetime. MoneyWorks will not (currently) complain about a long certificate lifetime. For REST services, you may not have control over all the clients that will access the service to do this, so a certificate signed by a recognised certificate authority is usually required.
Certificate lifetimes are shortening
It used to be that you could install a certificate once every 3 years. Currently, it is once per year. Standard SSL certificates signed by certificate authorities will eventually have their lifetimes reduced to just 45 days. This is an intentional change designed to force you to adopt automation in certificate management.
Automating certificate installation
If you already have arrangements to obtain and update certificates, you can copy and paste the PEM data into the MoneyWorks Datacentre Console UI, but that will become onerous when the certificate lifetimes are short. You should automate copying of the certificates into the MoneyWorks Datacentre settings folder.
On Mac, this is at /Library/MoneyWorks/Library/Preferences/. The certificate pem files to install are named server.pem for the certificate, key.pem for the private key file and ca.pem for the intermediate certificate bundle.
On Windows, this is at C:\ProgramData\Cognito\MoneyWorks Datacentre\. The certificate pem files to install are named server.pem for the certificate, key.pem for the private key file and ca.pem for the intermediate certificate bundle.
A new certificate will get loaded automatically when the service restarts overnight. If copying PEM data on a Windows server, keep in mind that it must be in OpenSSL-compatible format—meaning that line endings must be LF, not CRLF.
Obtaining certificates automatically in MoneyWorks Datacentre
To address this problem for customers who only need a certificate for MoneyWorks and do not otherwise need or want to deal with certificate management, we have built in automatic certificate management for Datacentre (in v9.2.3 and later). This will obtain a certificate from Let’s Encrypt and renew it automatically as needed.
To make use of this facility, you will require the following:
You will need a static IP address and a registered domain name for your server, with a public DNS record.
You must be able to forward port 80 from the internet to your MoneyWorks Datacentre server (at least for requests to .well-known/)
Datacentre uses the HTTP-01 ACME challenge method to verify eligibility for a certificate.
Given the above requirements, you can use the automated certificate request facility:
Select the Use Let’s Encrypt to obtain certificate checkbox
The server will restart to start an HTTP server on port 80. This server will ignore anything that isn’t an ACME challenge.
- Enter your fully qualified domain name for your server (i.e. the DNS name)
- Click Get Certificate..
This will:
- Test that the HTTP server is running on port 80 (make sure it is not locally firewalled!)
- Test that the HTTP server is reachable from the Internet (you will get a connection from a Cognito IP address)
- Ask you to agree to the Let’s Encrypt terms of service
- Create an account for the FQDN you specified
- Request a certificate from Let’s Encrypt (LE will contact your server from multiple locations)
- Install the resulting certificate in your Datacentre
If any step encounters a problem, the process will stop with an error message at that point. The Let’s Encrypt step is subject to rate limiting, but you can keep retrying the earlier steps while getting your network ducks in a row.
You can now go to the Service tab and enable Use TLS for your Datacentre and/or REST services. Click Apply Changes to restart the service with the new settings
Although the Get Certificate button will change to Renew Now, you do not need to manually renew the certificate. This will happen automatically when the certificate is close to expiry.
If your server domain name changes
If you change the FQDN, the Renew button will change back to Get Certificate. You can go through the process (clicking the button) to get a new certificate.
Note: On Windows, the tool for obtaining a certificate is simple-acme. In order to not accumulate renewals if you change the hostname, Datacentre will remove any renewal records in the simple acme data folder (which is in a hardcoded location that another instance of simple acme would also use). In the unlikely event that you are using simple acme elsewhere on the same computer, this may conflict with the other process using it. The dehydrated tool used on Mac keeps private renewal records (in /Library/MoneyWorks/Library/Preferences/dehydrated/accounts).
Obtaining an SSL certificate the hard way
You can obtain an SSL certificate the old-fashioned way from a Certificate Authority (not recommended). This involves generating a Certificate Signing Request and key and submitting the former to the Certificate authority.
Generate a private key for your server, and a Certificate Signing Request.
If you have openssl available on your computer (i.e. if you are using a Mac, or Windows 10 with a WSL linux distribution installed), here are the commands that you can enter into Terminal to generate these using openssl.
- Create a directory for the files
mkdir MyCertFiles
cd MyCertFiles
- Generate the private key and csr.
You will need to fill out the details for your certificate, the most important one being Common Name. This will be the Fully Qualified Domain Name for your server (e.g. yourserver.yourcompany.com). If you just hit return, the default value in [ ] will be used.
openssl genrsa -out private_key.pem 2048
openssl req -out mydomain.csr -key private_key.pem -new

Country Name (2 letter code) [AU]:US
State or Province Name (full name) [Some-State]:California
Locality Name (eg, city) []:San Francisco
Organization Name (eg, company) [Internet Widgits Pty Ltd]:My Company
Organizational Unit Name (eg, section) []:
Common Name (e.g. server FQDN or YOUR name) []: yourserver.yourcompany.com
Email Address []:

Please enter the following 'extra' attributes
to be sent with your certificate request
A challenge password []:
An optional company name []:
This will generate a private key that is not password protected, so it will be installable in the server as-is.
- Open the directory in the Finder
open .
- Submit the CSR file to your chosen Certificate Authority
They will provide a .crt certificate file. If asked what kind of server you have, just specify apache/openssl (this should get you a .crt pem format certificate).
Installing the SSL certificate
Your certificate should be in the form of a PEM text block (starts with ——-BEGIN CERTIFICATE——-)
Your private key is in the form of a PEM text block (starts with something like ——-BEGIN RSA PRIVATE KEY——-)
- Open thes certificate file in a text editor and copy and paste the text from the into the Certificate and Private Key PEM field of the SSL settings
- Open the private key file in a text editor and copy and paste the private key into thw Private Key PEM field of the Certificate window.
Installing the intermediate certificate
Certificates from most Certificate Authorities will also require one or more Intermediate Certificates to complete the Chain of Trust to a trusted root known to the operating system that clients are running. These certificates will be downloadable (or copyable) from your Certificate Authority's website. You should have received a link to them along with your certificate.
- Open the intermediate certificate bundle (usually called CA Bundle) in a text editor and copy and paste the text into the lower field of the Certificate window.
The Certificate window should display "Certificate Valid", along with the issuer and expiry date for the certificate.