The MoneyWorks Timer app (as well as a Reports app) is included with every installation of MoneyWorks Datacentre and MoneyWorks Now. It allows the recording of time and materials used on jobs from any browser, and hence can be used both on mobile devices (by plumbers, electricians etc) and on desktop machines (by graphic designers, accountants etc).
In essence the Timer app displays a list of active jobs from MoneyWorks and allows a timer to be started. This will run until it is stopped, or until another job’s timer is activated. The time can then be submitted back to MoneyWorks, where it will appear in the Job Sheet list. Similarly items can be requisitioned for a job, and these are recorded in the Job Sheet list. Billing for the job is done in the normal manner through the Bill Job facility in MoneyWorks.
Requirements for the Timer are:
– MoneyWorks Datacentre with REST service turned on;
– Remote access configured if access is required from outside the local network;
– Device with modern browser (iPhone, android etc).
MoneyWorks Now users must subscribe to the REST service to be able to use the Timer app.
A limitation is that the Timer app does not support serial/batch or location tracking for inventoried items.
Connecting to the Timer app
To access the Timer, start the browser on your device and enter the IP address of your Datacentre, followed by a colon, then the REST service port number (by default this is 6710). This will be something like:
http://123.456.689.12:6710
or, if the Datacentre has a certificate installed for REST access
https://123.456.689.12:6710
You can also use a domain name if you have one, for example
mydomain.com:6710
MoneyWorks Now users should use the domain name shown in the title bar of the Navigator window (after the @ symbol). This will be something like au01.moneyworks.net.nz, again followed by a colon and the port number:
https://au01.moneyworks.net.nz:6710
At this point you should be presented with the home screen for your Datacentre apps. Normally this has two buttons on it, one for Reports and one for Timer (if you have developed custom apps, there might be more). Tap the Timer button to open the Timer app.
Connecting to your MoneyWorks File
The home screen of the Timer app has two main buttons, “Jobs” and “Settings”.
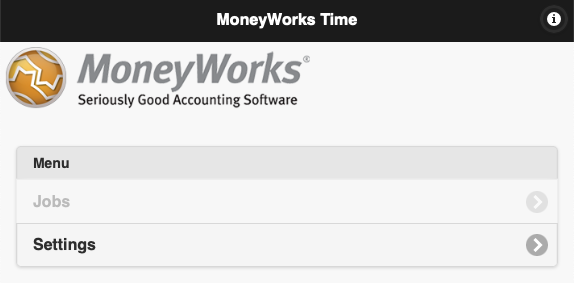
The Jobs button is disabled until you have connected to your MoneyWorks file. Most screens also have an info “i” button on the top right, which provides help and information.
Tap the Settings button to connect to your MoneyWorks file. The Datacentre/MoneyWorks Now settings page will be displayed.
If you are using MoneyWorks Datacentre:
- Enter the Datacentre username and password if there is one (these can be left blank if your Datacentre is not set up with a username or password). Note that this is not the same as your user name and password for your MoneyWorks file.
- Tap Save Settings to save your Datacentre credentials.
- Tap the Document Settings button to see a list of MoneyWorks files that are available.
- Tap the file to use, then enter your username and password for the file
- Tap Save Settings. The screen will redisplay the list of documents.
- Tap the Back button at the top left to return to the Datacentre settings
If you are using MoneyWorks Now:
- Enter your MoneyWorks Now user and password.
- Tap Save Settings to save your credentials.
- Tap the Document Settings button to see a list of MoneyWorks files that are available.
- Tap the file to use, and the Datacentre settings page will be redisplayed.
A Note on Security
Because your MoneyWorks credentials are saved on the device (so you don’t need to go through the rigmarole of entering them every time you use the app), anyone who has access to the device can potentially submit data to your MoneyWorks file. If you should lose your device, it is essential that you change your MoneyWorks password to prevent unauthorised access.
Item Source
The Datacentre/MoneyWorks Now page contains a field called Item Source. This is used as a filter for items which can be selected for requisition by this user (for example, a plumber might only be able to requisition items that are typically held in a van). Only items in the MoneyWorks file which have a value in Category4 that matches this Item Source code will be available to choose when the an item is requisitioned through the app.
Enter the code for the item source or leave empty for all items and tap Save – the number of items that will be available is displayed.
Click the Back button to return to the home screen, where the Jobs list will now be enabled.
Jobs List
To view the active jobs that have been assigned to you or your group, tap the “Jobs” button.
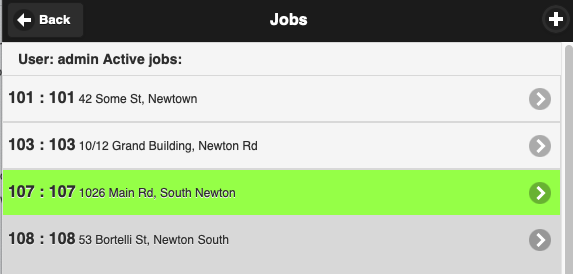
The jobs are listed in order of job code, and come in four shades:
– light grey: jobs which have no outstanding time on them
– dark grey: jobs which have time recorded against them, but the time has not been submitted to MoneyWorks
– blue: the job whose timer is active (only one job will have an active timer)
– green: a job that you have marked as being complete.
Tap a job to see the timer and logged details.
Timer screen
The timer screen shows the job timer at the top, and, depending on context, several buttons. Below this is a log of actions performed on this device against the job.
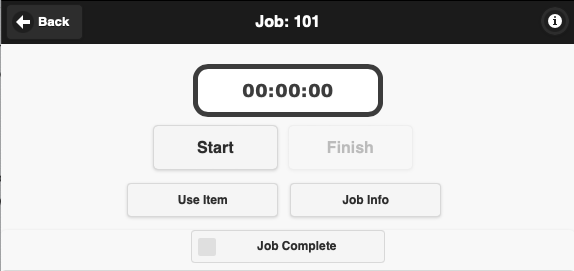
The buttons are:
Start: Tap this to start a timer for the job (if another job is being timed, it’s timer will be automatically stopped);
Stop: Tap this to stop the timer (this means that no time is being recorded, as only one job can be timed);
Finish: Tap this to submit the accumulated time to MoneyWorks;
Use Item: Tap this to requisition an item for this job;
Job Info: Tap this to view information about the job, and (by then tapping Edit Details, to alter the job description);
Job Complete: Set this to mark the job complete. The colour of the job will change to green in MoneyWorks, signifying that the job is completed and can presumably be billed out
Submitting time
To submit the accumulated time to MoneyWorks, tap the Finish button (this is only available when the timer is not running on that job). The Submit Job Sheet window is displayed with the following fields:
Resource: The is the time resource to use to charge the job. Each user needs at least one time resource set up in MoneyWorks (for example there might be separate charges for standard rates, overtime rate, night rates). The time resources for a particular user should have the user’s login name in category4. The sell unit of these time resources are important. The Timer will count the number of seconds you have worked on a job, and convert this to the appropriate units. The recognised units that will be converted are “sec”, “min”, “6mn” and “hr”. Any other unit will be assumed to be hours (i.e. the number of seconds recorded will be divided by 3600 to give the quantity).
Activity: An optional activity code for the entry. These are generated from a MoneyWorks Validation List called “Activity”.
Description: An optional text description for the entry.
Tap the Save button to upload the time information to the Job Sheet list in MoneyWorks and redisplay the jobs list.
Requisitioning Items
Tapping the Use Item button will display a list of items that can be requisitioned for the job (and are determined by the Item Source filter). The top part of the list shows the available time resources, allowing the recording of a chunk of time without using the timer itself. The remainder of the list (below the search box) are items that can be requisitioned (entering text into the search box will filter these items based on the text entered.).
Tapping an item in the list takes you to the requisition screen for that item.
Enter the quantity (or tap the + and – buttons to increment/decrement the value) and a comment, and tap Submit.
Configuring your MoneyWorks file
Some configuration of your MoneyWorks data is also required for the Timer app to function.
- You should create a separate user for each person using the app under File>Users and Security, plus time resources in the Item list for each user. The category field in the user record can be used to specify the group (if any) that the user belongs to, and that user will be able to see jobs assigned directly to him/her or to the group. A user whose category is super will be able to see all jobs.
- To associate a particular time resource with a user, enter the user’s login name in category4 of the item record. Each user should have at least one time resource (but may have more if they have different charge out rates).
- Jobs are assigned to individual users by putting their login name or group into category4 of the job record. Apart from the “super” user(s), the jobs list on the app will display only jobs assigned to the user and/or the user’s group (if any).
- Items that can be requisitioned are filtered by the value in the Item Source field of the app. This will limit the items that are displayed in the app by displaying only those items that have the same value in category4 of the item record (it is not uncommon for a MoneyWorks file to have over 100,000 items). For example, items that are normally held in a van might me marked with “VAN” in category4, so setting the Item Source to “VAN” would just make those items available. Non tangible items (like MILEAGE) can be included.
- Activities can be set up as a special Custom Validation List called Activities. Activities are the type of work done for the job (e.g. Meeting, Design, Maintenance), and are available in a drop down whenever time recorded by the timer is submitted. If used, these will populate the Activity field in the Job Sheet.